MARBLE PROJECT
For this project you will use your textbook as a reference. You may either duplicate the marble portion as outlined in the text, use the process linked below from Rosebrand Company or copy a marble painter elevation. We will discuss the paneling details in class.
OVERVIEW
Marble is an important technique in the scenic artist's bag of magic.
With a paintbrush, you can create the illusion of elegance and taste without
using expensive scenic materials.
Marble breaks up large areas of the stage through the movement within
the stone. This movement can be
directional and used to create a dynamic space. Color provides a show with mood and tone. The marble texture says wealth and
social standing. Marble generates
an interesting background through a very controlled design plan. Therefore, as a scenic artist it is
important for you to learn the technique and then COPY your elevation as the
designer should be very careful about color, direction and the sort.
A word about the surface treatment of the scenery … finished marble is cut and polished. This is why there is a reflected shine to it. A scene artist can do wonders with a paintbrush but the shop needs to assist in the process. If you are painting marble, you must insist that your surfaces are clean and absolutely smooth. If there are seams in the walls, for example, these need to be filled and sanded. Otherwise, the construction seam will show and the believability of the marble will be exposed.
Accompanying this introduction is a series of handouts to assist you in analyzing marble and provide steps to consider when painting.
You should develop a morgue of marble samplings. Some popular cones are sienna and travertine (a light brown), Italian Carrarra (a pure white), Egyptian red, serpentine (mainly yellow-green and green), rose marble and black-and-gold marble.
PROCEDURES
There are several methods of painting marble. I prefer painting down and the floor so I can control my wet blends but this is not always possible. If you must paint “up”, I suggest painting a series of transparent glazes.
WET BLENDS ... PAINTING DOWN
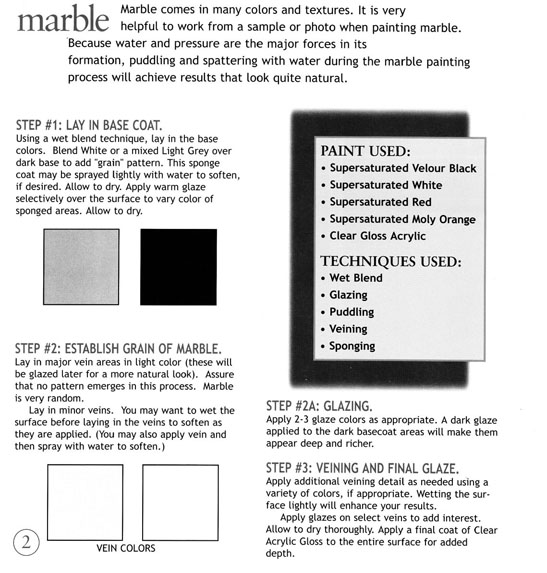
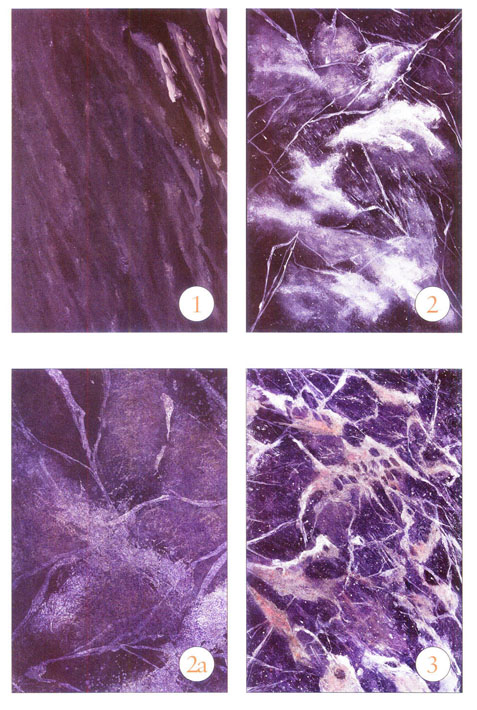
Base coat your scenery with a white or appropriate light opaque tone. Use two basic hues that you have determined through an analysis of the elevation. Wet blend together in the direction of the flow of the marble rock. While still wet, take the veining colors (a dark and a light) and trail them through the wet-lay-in either with the tip of your brush or the side or a flat sponge. Vary the width of the lines, crossing and intersecting them. While the painting is damp, spatter the surface, allowing it to run a bit so the brush marks are diffused. When dry, apply a dominant vein if the others are too soft. Allow to completely dry. The GLOSS the entire surface.
GLAZES and PAINT UP
Base coat as suggest above. STUDY YOUR MARBLE SAMPLE for direction and flow. Think of the rock is dimension. If you are paint a statue, for example, the veins of marble will cut through the rock.
Use 3 or 4 colors. Apply by building up the colors, starting with darker than the background. Lay-in wet in the direction of the flow. Next detail the marble in the shape of veins. Once dried, reglaze for further depth. GLOSS.
The wall needs to have wallpaper. You are to select a wood grain appropriate for a panel that will "read" from the audience and not be too cartooned. Color, style and finish are up to you to decide. You must, however, have elevations to serve as research. The finished project can range from a wealthy home to a run-down tenement house.